3. Installing DFM on Ubuntu
3.1. Introduction
This section provides you with a detailed installation method for DynFi Manager on Ubuntu.
You can also install DFM using other methods:
Installing DFM using our script for Linux Ubuntu, Debian, or macOS
Installing DFM using Docker for a Docker-based installation
Note
DynFi Manager can be downloaded and installed for free, allowing you to manage 1 to 3 devices – with most software features.
Note
If you want to manage more than 3 devices, please consider buying a license.
3.2. Prerequisites
Ensure you have Java 11+ and MongoDB 4+ (recommended: 6+) installed or available on your system.
3.2.1. Checking Java
To check if Java is installed, run the following command in your Command Line Interface (CLI) or terminal:
java -version
The expected output might look like this (yours may differ slightly):
openjdk version "11.0.25" 2024-10-15
OpenJDK Runtime Environment (build 11.0.25+9-post-Ubuntu-1ubuntu124.04)
OpenJDK 64-Bit Server VM (build 11.0.25+9-post-Ubuntu-1ubuntu124.04, mixed mode, sharing)
If the system responds with something like:
Command 'java' not found, but can be installed with:
(...)
It means Java is not installed.
To install Java 11, you can use OpenJDK:
sudo apt-get install openjdk-11-jre-headless
Note
On newer versions of Ubuntu, Java 11 may not be available. In this case, install openjdk-17-jre-headless.
Alternatively, you can install Java provided by Eclipse Adoptium at https://adoptium.net/.
3.2.2. Checking MongoDB
DynFi Manager also requires MongoDB. It can be installed either on the same machine as DynFi Manager or on another host accessible within your network.
Refer to this tutorial for instructions on installing MongoDB on your system.
To verify the installed version of MongoDB, run:
mongosh --eval "db.version()"
Ensure the output shows at least version 4.x. For example:
8.0.3
Note
MongoDB 4.x is the minimum supported version. DynFi Manager has been tested on subsequent versions, up to 8.x.
3.3. Installing DynFi Manager using APT repository
Once Java 11+ is set up and MongoDB is accessible, follow these steps to install DynFi Manager using the APT repository:
Add the DynFi GPG key and repository:
wget -qO - https://archive.dynfi.com/dynfi.gpg | \
    sudo gpg -o /usr/share/keyrings/dynfi.gpg --dearmor

echo "deb [ signed-by=/usr/share/keyrings/dynfi.gpg ] https://archive.dynfi.com/ubuntu `lsb_release -cs` main" | \
    sudo tee /etc/apt/sources.list.d/dynfi.list
Update the package list and install DynFi Manager:
sudo apt-get update
sudo apt-get install -y dynfi
Start and enable the DynFi service:
sudo systemctl start dynfi.service
sudo systemctl enable dynfi.service
During the installation, a configuration wizard will guide you through creating the default configuration file /etc/dynfi.conf with basic settings (see DFM Configuration for more details).
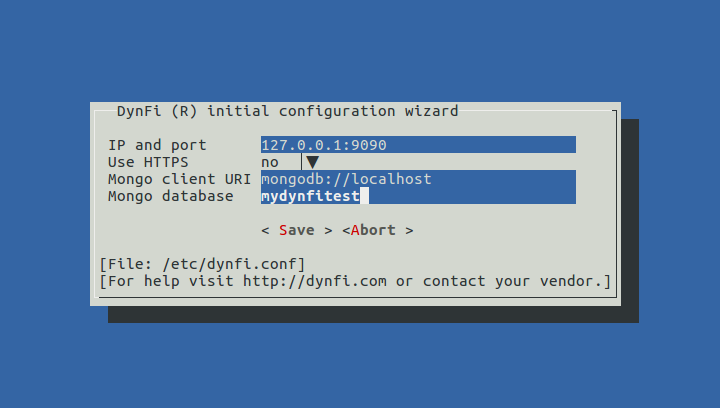
Configuration wizard
Select the <Save> button to complete the installation process and start DynFi Manager on the specified IP and port.
Note
If you do not see the wizard, Java 11+ may not be properly installed.
You can now configure DynFi Manager as needed (see the DFM Configuration chapter) and begin using it (refer to the First steps with DFM chapter). For troubleshooting, consult the DFM Logs chapter.
3.4. Upgrading DynFi Manager
If you installed DynFi Manager using the above procedure, it will be upgraded automatically along with other system packages during a system update.
To upgrade DynFi Manager manually, use the following command:
sudo apt-get update && sudo apt-get install -y dynfi
Note
The below error means that you have an old GPG key of dynfi archive:
W: GPG error: https://archive.dynfi.com/ubuntu jammy InRelease: The following signatures
couldn't be verified because the public key is not available: NO_PUBKEY 2079EC54B6DEDE63
Download the key first with:
wget -qO - https://archive.dynfi.com/dynfi.gpg | \
    sudo gpg -o /usr/share/keyrings/dynfi.gpg --dearmor
If you’re using the new (default since Ubuntu 24.04 Noble) .sources format, your /etc/apt/sources.list.d/dynfi.sources.list file should look like this:
Enabled: yes
Types: deb
URIs: http://archive.dynfi.com/ubuntu
Suites: noble
Components: main
Signed-By: /usr/share/keyrings/dynfi.gpg
For legacy format use this command:
echo "deb [ signed-by=/usr/share/keyrings/dynfi.gpg ] https://archive.dynfi.com/ubuntu `lsb_release -cs` main" | \
    sudo tee /etc/apt/sources.list.d/dynfi.list